Welcome to the Blazor Simple AI Single Page App, Part 6 of the Microsoft AI services journey, which now includes Microsoft Azure Open AI image generation.
To download the project documentation, you can download a PDF here.
Since part 5, the following changes to the project have been implemented.
Project Changes
ImageGen.razor page has been added to the project Pages folder. This is a page hosting the image generation component and necessary code
AzureOpenAIImageGeneration.razor component has been added to the project components folder which handles the user prompt, then displays the image viewer dialogue with the Azure Open AI generated image
ImageViewer.razor component has been added to the project components folder. This displays the image dialogue
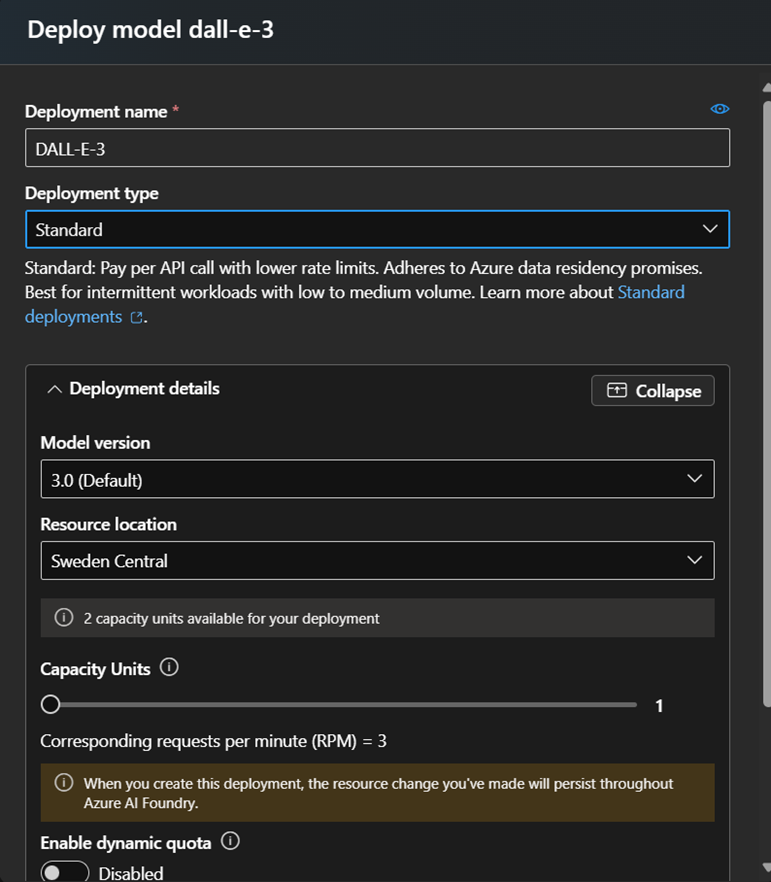
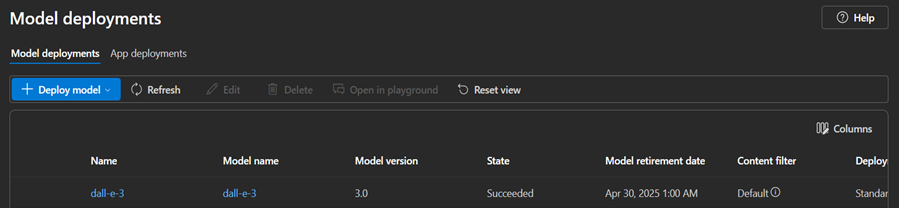
The following configuration changes have been added to AppSettings.Json for the DALL-E deployment name
“AzureAIConfig”
{
“OpenAIDALLEEndpoint”: “[Your Azure Open AI endpoint which is hosting the DALL-E deployment]”,
“OpenAIKeyDALLECredential”: “[Your Azure Open AI key] “,
5) The following base model was added to the Open AI Service.
Components
ImageGen.razor (page)
The ImageGen.razor page is used to host the prompt for the user to generate the image. This is distinctively similar to the Open AI Chat index page, which follows a similar pattern to accept text prompts or audio recordings and then the text is passed to the child component, AzureOpenAIImageGeneration, to process the text and generate the image from the Azure Open AI service.
service.AzureOpenAIImageGeneration.razor
A component which accepts the text from the prompt and then calls the Azure Open AI service to generate the image.
ImageViewer.Razor
This component displays the output, the image, generated from the Azure Open AI service which is the template for the image dialogue box. This is called from the Image Generation child component.
The UI
I have added a Image Generation navigation link to the landing page.
Sample Questions and Responses
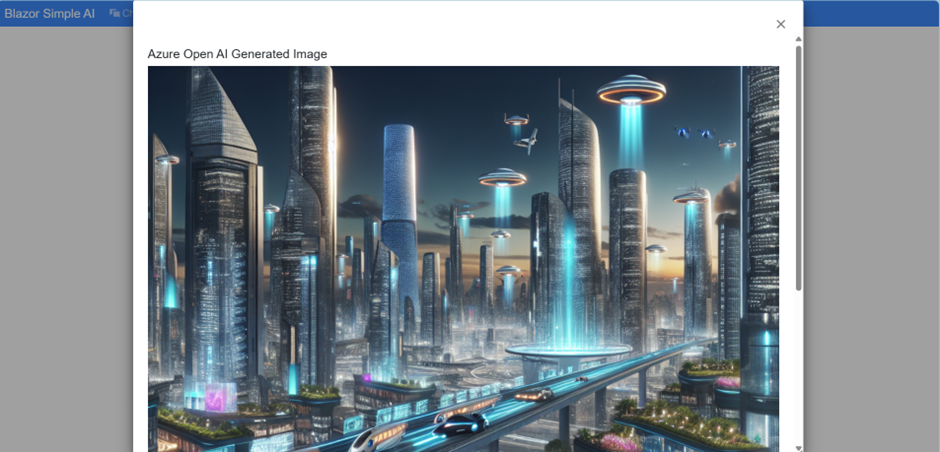
Question 1
“Draw a futuristic city”
Output for question 1:
The process takes a few seconds for the image generation to complete, so I have displayed a spinning wheel and a prompt for the user to wait for the result.
The output is displayed as follows:
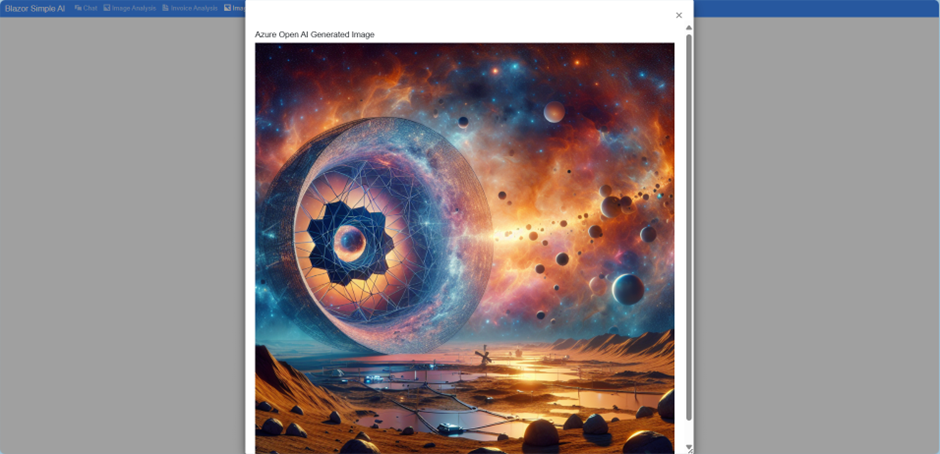
Question 2
“Origins of the universe by the James Webb telescope”
The output is displayed as follows:
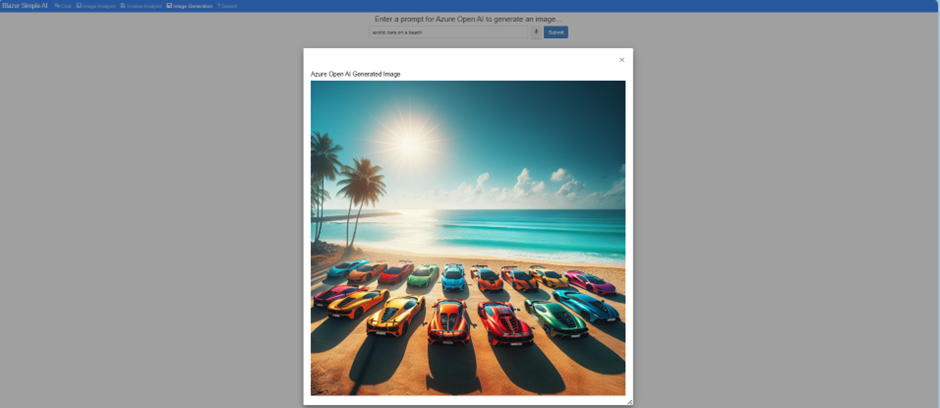
Question 3
“exotic cars on a beach”
The output is displayed as follows:
That’s it!
This shows how simple it is to integrate a Blazor Web application with Azure Open AI image generation.
A .NET8 C# Application to Process Microsoft 365 Email Messages and Attachments
Introduction
Recently, I was asked how attachments from a Microsoft 365 mailbox could be automatically pushed into an Azure storage file share, so that the attachments can be made accessible to an onward process which needs to be executed on an Azure Virtual Machine. Whilst there are many ways this can be achieved; I decided to create a C# Console application to process the messages and attachments from Microsoft 365 mailbox inbox folder.
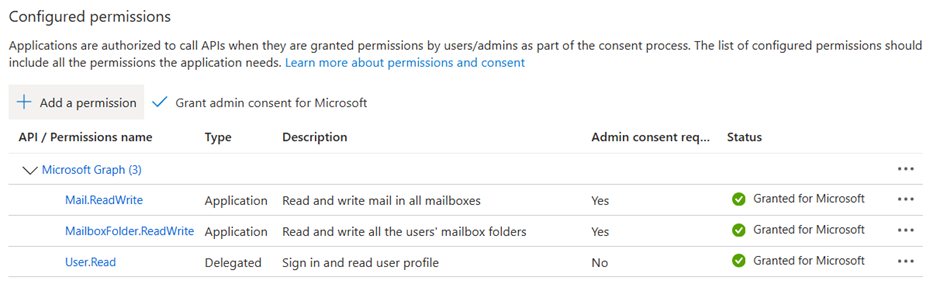
“MSEntraApplicationClientId”: “[Microsoft Entra ID Application Id]”,
“MSEntraApplicationSecret”: “[Microsoft Entra ID Application Secret]”,
“MSEntraApplicationTenantId”: “[Microsoft Entra ID Tenant Id]”
}
}
Application Runtime Process
The application process is described below.
The configuration is initialised
The messages are retrieved from the defined mailbox folder name
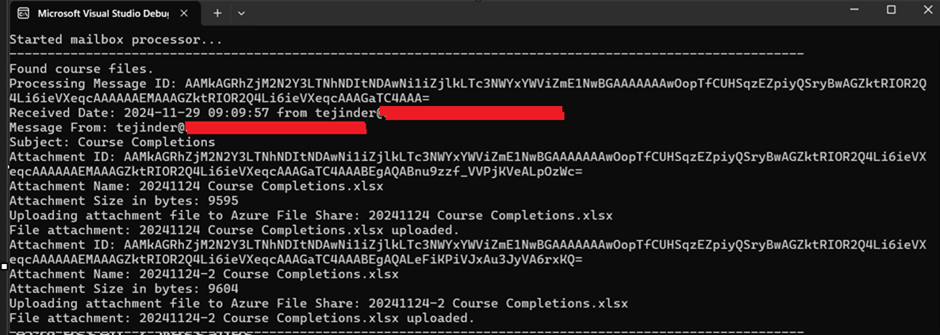
Each message is processed in the message collection and the emails with the matched string that are contained in the subject are processed
A console output of the message ID, received date, received from, and subject is displayed
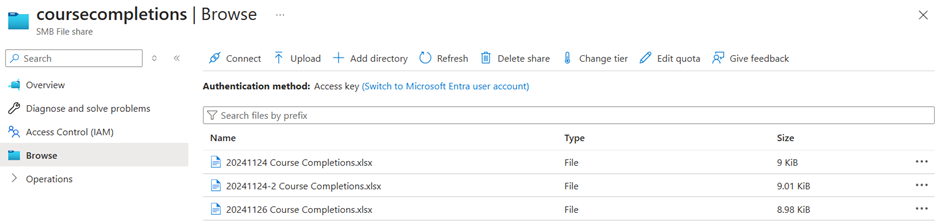
Each attachment is processed and if the file is a file attachment, then the attachment is uploaded to the Azure file share specified in the Azure storage account connection string and file share name
The number of messages processed, and the number of attachments processed is displayed in the output of the console
Sample Output
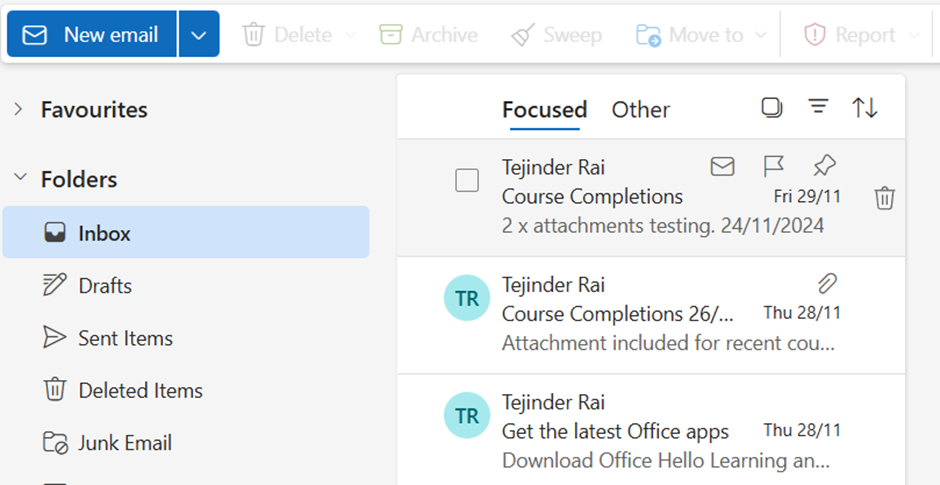
The mailbox has two messages with the subject containing the search string “course completions”.
The mailbox attachment processor is executed, it displays the following output.
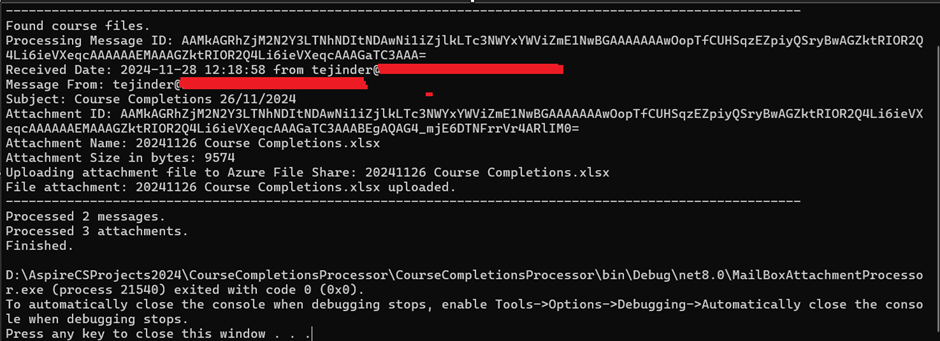
Two messages are processed, although three were seen in the previous email, but since the search string was not contained in the subject, only two messages were processed which were matched.
Two messages are processed, although three were seen in the previous email, but since the search string was not contained in the subject, only two messages were processed which were matched.
Three attachments in total were processed and uploaded to an Azure storage file share.
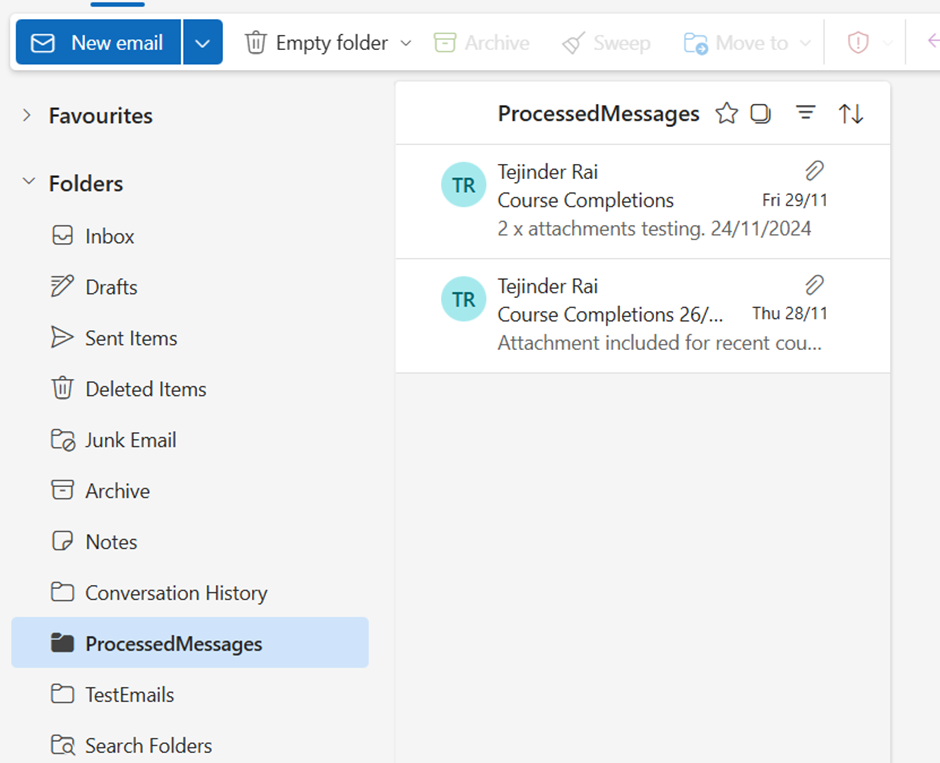
The email messages were moved to the ProcessedMessages folder, as defined in the application setting ProcessedMessagesFolderName.
When the application is executed again, the output is shown below as there are no longer any matched messages to process.
Closing Thoughts
From a development point of view, using this method provides a simple solution. Other considerations:
Store the storage account key in Azure Key Vault
Store the application secret (if used( in Azure Key Vault
The Azure resource hosting the application e.g. Function App, can have a managed identity and RBAC access can be provided to Azure Key Vault for the service principal (Azure Key Vault access policies are now deprecated)
Environment settings can be stored in the hosting environment configuration rather than in the appsettings.json file.
Welcome to the Blazor Simple AI Single Page App, Part 5 of the Microsoft AI services journey, which now includes an audio recording button in the Open AI Chat component.
If you would like to download the whole series of posts for the Blazor Simple AI Project, you can download the PDF here.
Visual Changes
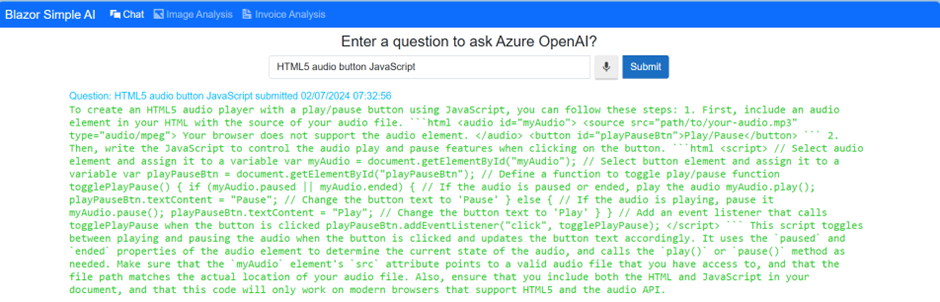
The audio button has been added to the index.razor page as this is the main landing page. The audio button component is part of Radzen Blazor and simple to interact with which is the RadzenSpeechToTextButton. This utilises JavaScript as a component itself, there is an API to get user media.
The new landing page has the audio button added next to the chat text box.
When you click on the audio button, the first instance will provide a prompt requesting access from the site to the devices microphone, then recording has started as shown below.
When you are finished speaking, you click the button to stop recording and the text is submitted to the Question string and a OnChange event occurs and the Question value is set, then the state is changed for the component. Since the Question string is a bound field to the child component, AzureOpenAIChat, which then executes the component code to call the Microsoft Azure Open AI service with the text that was bound to the Question string.
An example of the recorded audio text and Azure Open AI response is shown below.
Code Changes
The following code changes were made in index.razor.
Note: I removed the question marks and period from the string return from the Radzen Speech To Text button as the characters were automatically to the returned text string value from the component.
Welcome to JARVIS, the AI document redaction processor. At the time of publishing this version of his document, I was still developing Jarvis as a fully working product. The current version supports word documents and PDFs. With the development of Blazor Simple AI, I can also utilise the image analysis component to redact PII information from images..
If you would like to download a PDF of this post, you can download it here.
Jarvis is made up of the following technologies:
Microsoft .NET Blazor (.NET 6.0 LTS release)
Microsoft Azure Cognitive Services (Text Analytics Service)
Microsoft Azure Cosmos DB (for maintaining document and redaction processor metadata)
Azure Web App (hosting the JARVIS AI Web App)
Azure Storage (source document upload and redaction storage)
Microsoft Azure Function App (for APIs that process PII data and perform redaction processing)
Radzen Blazor components (for an amazing UI experience)
A document named “IPAddressandNamesx10Pages.docx” contains the following information, repeated within 10 pages.
——————————————————————————————————————————-
The IP Address if the legacy system is 10.254.1.1.
The company that owns the legacy system is Microsoft.
The original founders of the company Microsoft are Bill Gates and Paul Allen.
——————————————————————————————————————————-
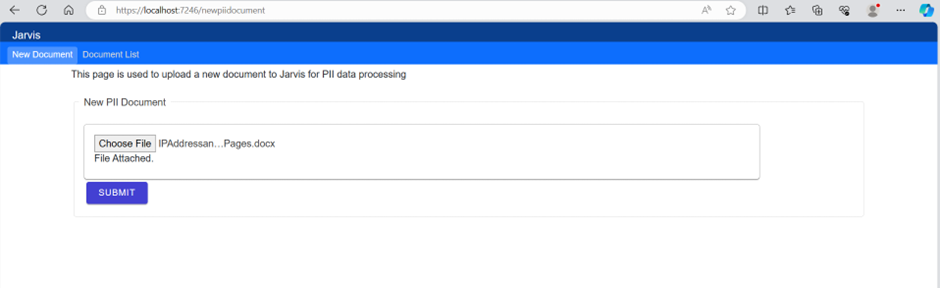
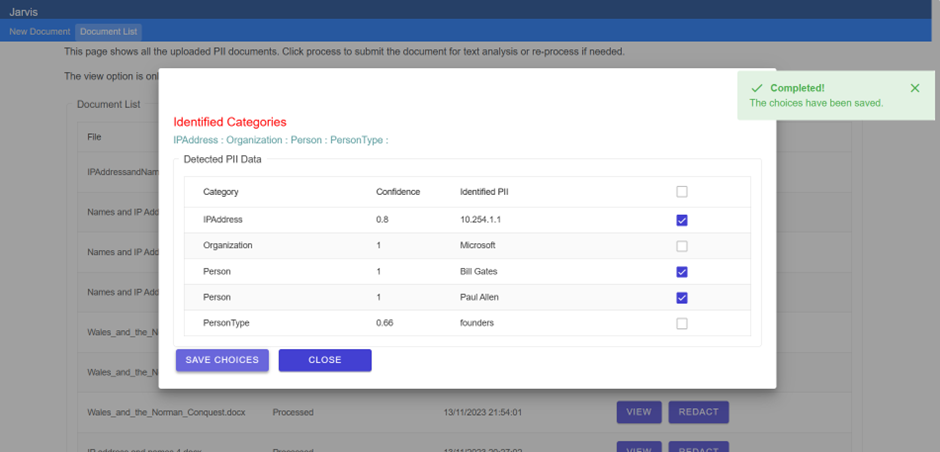
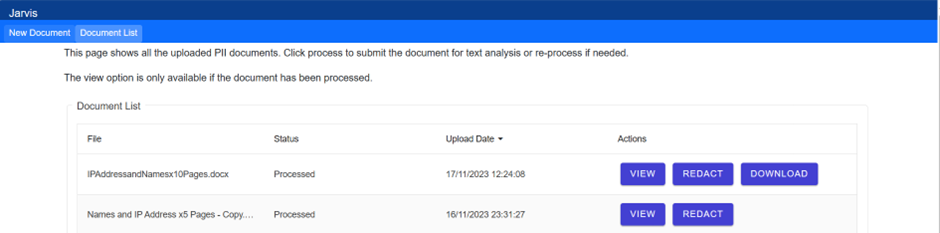
The document is uploaded to Jarvis, the AI Document redaction processor.
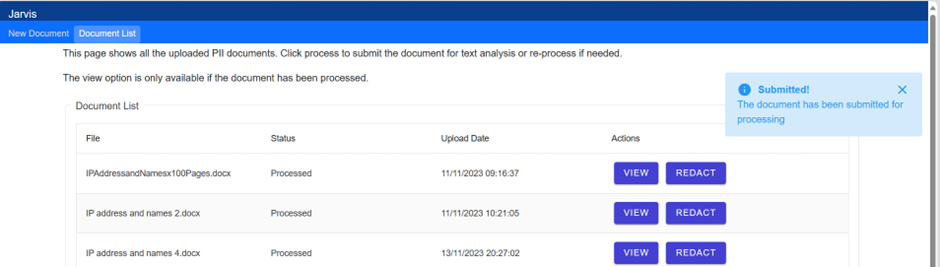
The user clicks “Process” to determine the PII and confidential data held in the document.
A notification is sent to the user to advise the document has been submitted for processing.
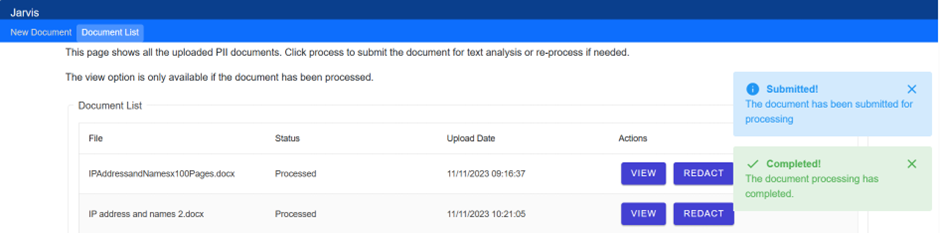
About 3 seconds later Jarvis has identified the PII and confidential data in the document and provides a notification to the user.
The user can then click “View” and then select which data needs to be redacted from the document.
The user then clicks “Save choices”. This will save the collection of choices, the metadata, to Azure Cosmos DB.
The user then clicks “Redact” and the user is notified of the submission and completion.
The user clicks the download button which is available after the redaction process has completed. The document is displayed with the information redacted using Microsoft Office apps (this can be downloaded to the machine directly also).
The process is going to be made simpler by a set of walkthroughs in the UI which will be a set of steps with instructions, including a preview document component.
Welcome to the Blazor Simple AI Single Page App, Part 2 of the Microsoft AI services journey, which now includes image analysis utilising Microsoft Azure AI Vision. The Vision Read API is used to extract the text from an image. This document explains the project in my GitHub repository which is available here: https://github.com/tejinderrai/public/tree/main/BlazorSimpleAI.
If you would like to download both part 1 and part 2 as a PDF document, you can download the PDF here.
Since part 1, the following nuget packages have been added to the project.
Azure AI Vision Image Analysis – for reading text and metadata from images.
Radzen Blazor – for providing an amazing UI experience.
Azure Storage Blob – for handling interactions with Azure Blob Storage.
Visual Changes
I have made some appealing improvements from the basic Blazor template and styled the UI based on a project from Martin Mogusu available here: GitHub – martinmogusu/blazor-top-navbar: A top navbar example created in blazor. This saved me a lot of time and all I had to do was apply my own visual styles after the top navigation was applied to the project in shared/NavMenu.razor. In addition, I had added a pre-built model for interactive Invoice Analysis and processing, which I will leave the full explanation until Part 3 of this post.
Components
Three components have been developed for the image analysis. These are as follows:
Vision.razor – The Image Analysis page
VisionBlobLoader.razor– This includes the capability to upload files to Azure blob storage, which also sets the content type for the blob file.
VisionBlobFileList.razor – This is a child component embedded into the VisionBlobLoader component, which lists the image files that have been uploaded to Azure blob storage.
Note: Whist this project utilises the service key, in an enterprise environment, you must consider using token based access to the service secured by Microsoft Entra ID, or if you wish to utilise the service key for any reason, utilise Azure Key Vault to protect the key used by the application with a managed identity for the application to access the service key stored in Azure Key Vault.
Components
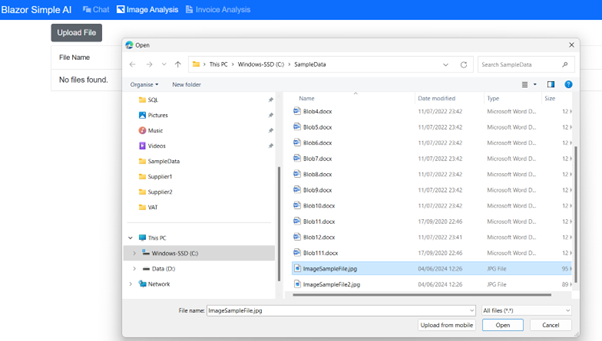
File Upload Component (VisionBlobLoader)
The file upload component utilises Blazor InputFile for the user to select the file to upload in the application. The component reads the Azure Storage connection string from the configuration, including the container, then uploads the file to the container and also adds a blob http header for the file content type taken from the file properties. The Radzen notification service is used to notify the user of the application activities. I also included a basic spinner as part of the interaction for the upload process.
Blob List Component (VisionBlobFileList.razor)
This component reads the Azure Storage connection string from the configuration, including the container, then displays the blob file names in a Radzen DataGrid. A button is added to Analyse the image, which then calls the Radzen notification service to display the activities being taken by the application.
Data Classes
Two data classes have been created as follows:
AzureBlobFile.cs – Azure blob file properties
ImageDetails.cs – Image details for extraction from the AI Vision Analysis
The UI
The UI is as follows. Notice the menu control has now changed since Part 1. Invoice Analysis will be formed in Part 3, at the time of writing this blog post, I had already uploaded the code to my GitHub repo.
Home page (Chat)
Image Analysis
Upload File Control
Upload Action Spinner
Radzen Blazor File Uploaded Notification
Process Button
The process button read the application configuration for the Azure AI Vision endpoint and service key, then retrieves a SAS token from Azure for the blob being processed and a URL is generated with the generated SAS token, then this is submitted to Azure AI Vision with the generated URL. The SAS token is generated by the async method CreateServiceSASBlob(string BlobName) in the component class. Whilst the method can be defined as a utility class, I have composed this for easier reading of code.
Image Analysis Dialog
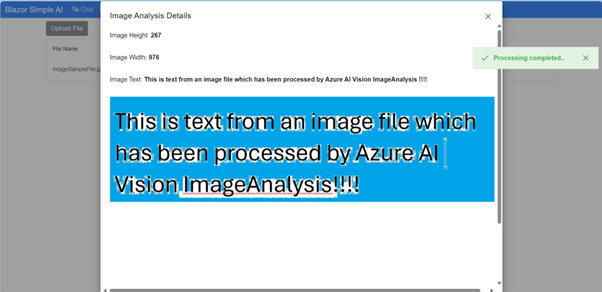
When the image processing has completed, a Radzen notification is displayed to the user, with a Radzen dialog popping up to show basic metadata (height and width) of the image, including the text the AI Vision service has extracted as well as the image itself.
That is AI Vision and Image Analysis wrapped up.
Part 3 will focus on processing invoices using the pre-built AI model “prebuilt-invoice” part of Microsoft Azure AI Document Intelligence and creating output files for further processing.
Welcome to the Blazor Simple AI Single Page App, the AI App that responds to questions instantly using Microsoft Azure OpenAI Services. This document explains the .NET project I developed which I have pushed to my public Github repository which is available here: https://github.com/tejinderrai/public/tree/main/BlazorSimpleAI.
If you wish you to download the PDF version of this blog post, it is available here.
Technologies
Blazor Simple AI is made up of the following technologies:
Microsoft .NET Blazor (.NET 6.0 LTS release)
Microsoft Azure.AI.OpenAI .NET Library
Microsoft Azure AI Services – OpenAI
It’s that simple!
Why Blazor?
Blazor is simply amazing, I have been developing Blazor projects for over four years. There has been great demand for Blazor over the past few years and as a component framework and use of C# this is exactly what I need to develop solutions and concepts super fast!
What Blazor Simple AI Does?
Blazor Simple AI is a Blazor server side single page app which has a single page and a single component. The razor page has two basic user interface controls, a textbox and a submit button for a user to enter the question for Azure OpenAI. The component “AzureOpenAIChat.razor”, has a single parameter which receives the question from the main index page. When the parameter is received by the child component, the component has OnParametersSetAsync() method which then retrieves the appsettings.json values in relation to the Azure OpenAI service AI endpoint, Azure OpenAI key and the deployment name which has the associated model, which was deployed with Azure AI Studio, then send the text to the Azure OpenAI service and retrieves and displays the response.
Core Blazor Template Changes
There have been some basic changes to the basic Blazor layout to accommodate the project. These are as follows:
The sidebar has been removed from the MainLayout.razor page
A new Index.razor.css style sheet has been added to centre the UI components on the page
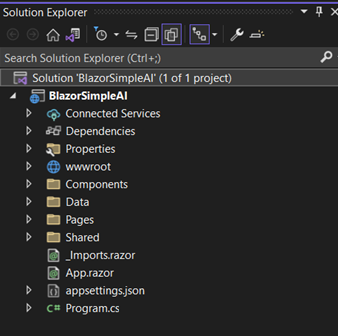
A new Components folder has been added to the project
A new component named AzureOpenAIChat.razor has been added into the Components folder
A new configuration section has been added to appsettings.json to include the configuration required for the project to interact with the Azure OpenAI service.
The title and main element have had text changes to represent the project name and description
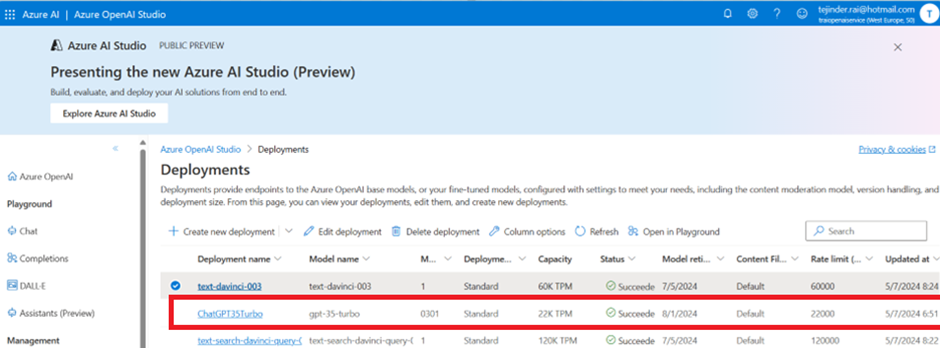
Manage Deployments in Azure AI Studio and create a deployment using the gpt-35-turbo model
Update the appsettings.json with the settings
"AzureAIConfig": {
    "OpenAIEndpoint": "https://[You Azure OpenAI Service].openai.azure.com/",
    "OpenAIKeyCredential": "[Your Azure Open AI Key]",
    "OpenAIDeploymentName": "[Your Azure Open AI Deployment Name]"
    "RetroResponse": "true or false"
}
Build the project and ask Azure OpenAI anything you like.
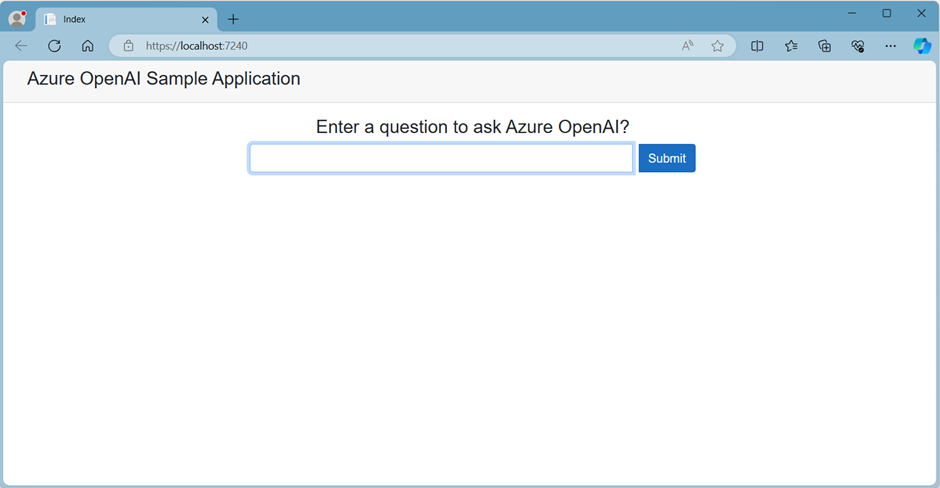
The UI
The landing page.
Sample Questions and Responses
Question 1
Who founded Microsoft?
Question 2
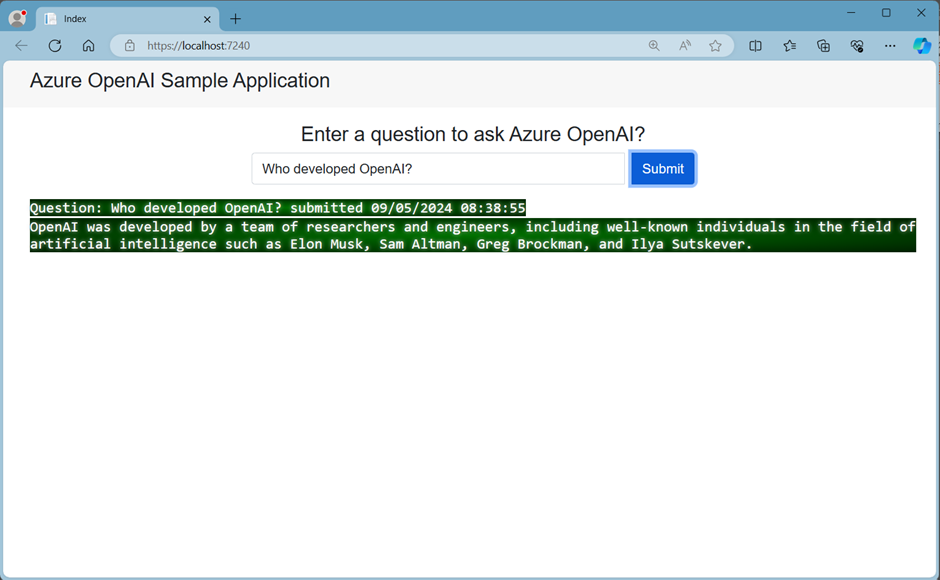
Who developed OpenAI?
Question 3
How can I develop a Blazor App?
Basic CSS
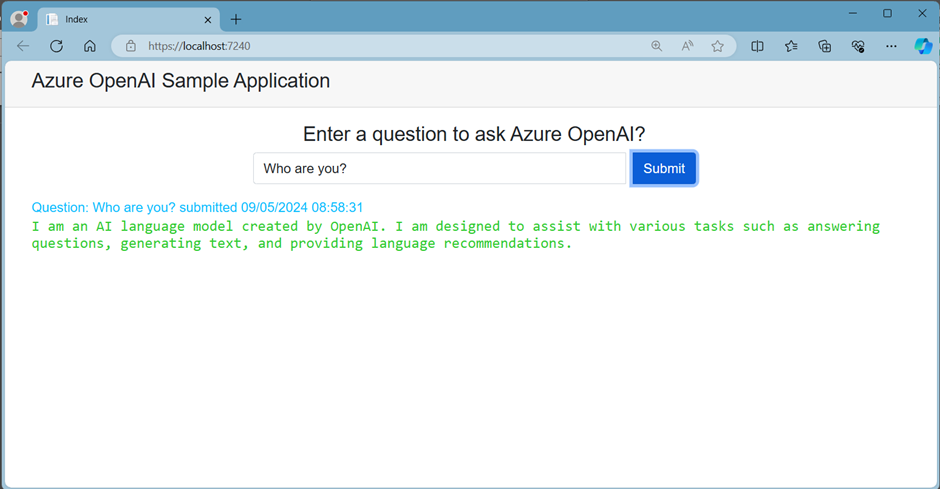
The AzureOpenAIChat.razor component has a basic CSS style sheet which allows the deployment to have a retro style response or a basic response text visualization option. If the app setting below is set to true, you will get the retro response as per the sample above. For a standard non-retro style response, you can set the value to false, example below.
Over the past few months I have been working on a sample project, which will eventually be published to my GitHub repo. The project specifically focusses on Microsoft Entity Framework with an Azure SQL database and also utilises Blazor as the underlying UI and logic layer, including DevExpress for Blazor UI components. This is an initial post which describes the project and it’s capabilities.
The CarShop project was envisioned from wanting to build something new and then work on multiple articles rather than only a few for a project, for part of this year. This will enable me to provide updates at various intervals and at some stage, including the publishing of the code.
Why a CarShop?
Since I am car fan and have been for many years, I thought this would be an exciting project to work on this year. With Blazor + .NET and DevExpress being some of my favorite development frameworks, I thought this would be ideal as a project.
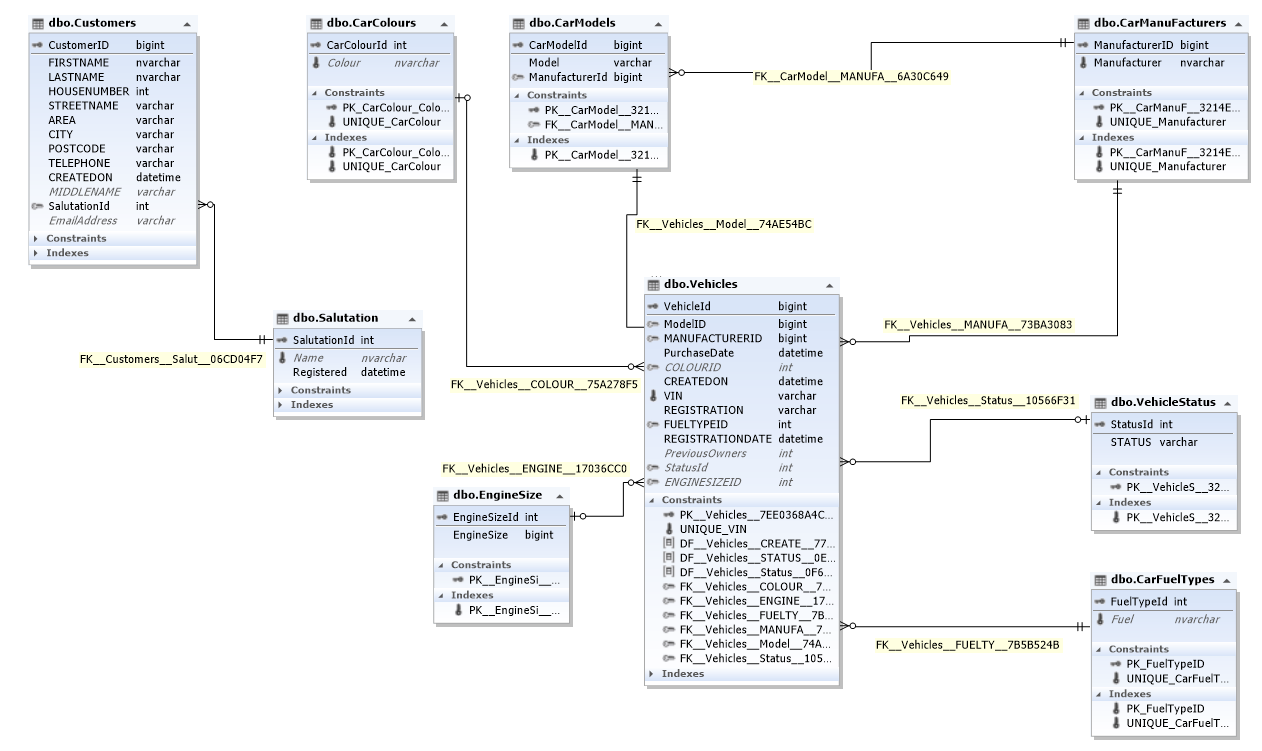
The database schema
Since I am using the Microsoft Entity Framework in the Blazor Visual Studio project, the schema was exactly where I wanted to start. As the iterations developed, I decided to go straight into Azure SQL to provision my tables, entities and relationships, primary keys and foreign keys etc. The project needs to store car details (at a basic level), customer details, car manufacturers, car models, fuel types, engine sizes etc. Whilst it is a simple model to start with, it’s relatively simple to expand the schema as I see fit, both from the SQL backend as well as the coded elements and data classes.
CarShop Schema – Developed using dbForgeStudio 2022 for SQL Server
Since this is a relatively simple sample project, the data is held in a single Azure SQL database. As you can see, the Vehicles table has the most relationships with car fuel types, vehicle status, engine size, colours, models and manufacturers. For the customers table, I’ve kept the design simple for now although I intend to expand this into a scenario where there may need to be some data quality checks and periodic checks around when the customer data was last updated, for reasons I will include in a future post.
Part 2 will focus on the Transact-SQL, so that the schema can be provisioned.