Over the past few months I’ve been working with the content team in Redmond to publish a hybrid disaster recovery approach for SharePoint 2013 with SQL Server AlwaysOn Availability Groups with Microsoft Azure. Today, the article was published and can be found below.
I’d ike to acknowledge the following people who provided valuable assisance in testing, reviewing and publishing the article on TechNet with me over the past few months in order to get this published in the detailed form that it is today.
Recently, I had a requirement to host and test a Workflow Manager farm in Azure IaaS with SharePoint 2013. The key element here was to ensure high availability for the SharePoint farm and the Workflow Manager farm as part of the design. This can be achieved by appropriately spreading your farm tier across availability sets, to ensure that the appropriate roles are available during host patching. This, of course, would include the database tier, where you could utilize SQL Server AlwaysOn Availability Groups in synchronous commit mode to achieve maximum uptime.
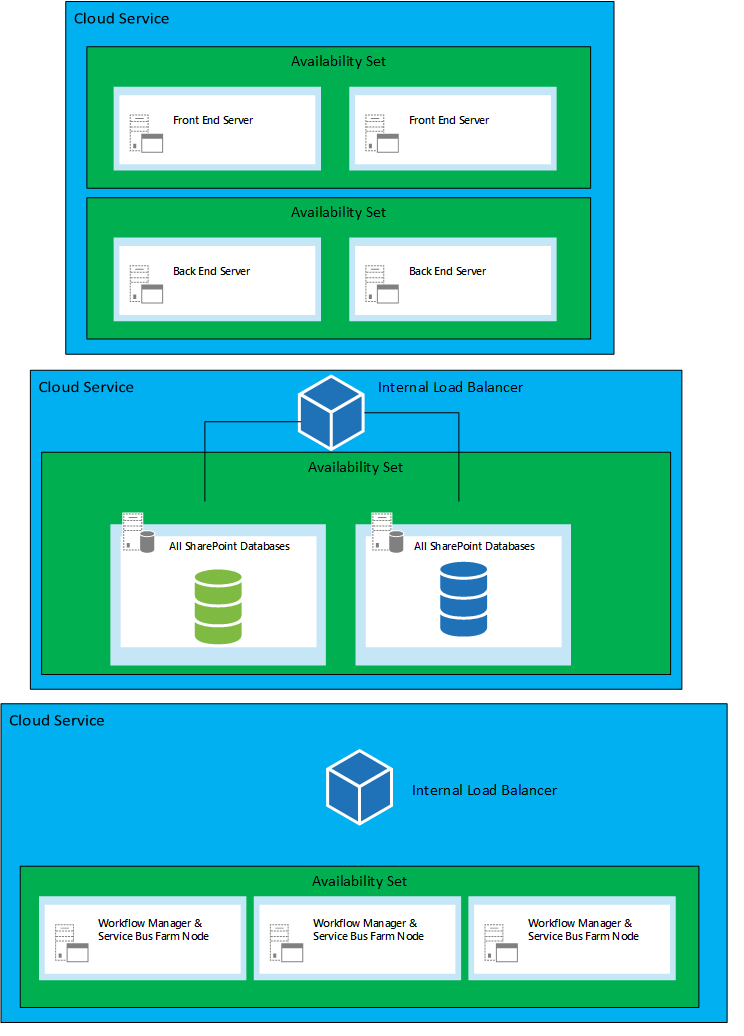
Cloud Services Generally, you would want to have separation between the SharePoint farm, SQL infrastructure and the workflow manager farm. I personally would recommend using the new regional networks in Azure so that you can utilize internal load balancers required for Workflow Manager high availability. The picture below depicts a very basic farm with high level components, including Workflow Manager within its own cloud service.
.
Internal load balancers are used for SQL Server AlwaysOn, currently supporting one AG in Windows Azure since the Internal Load Balancer (ILB) supports only one IP address. The SharePoint farm would access SQL Server ideally via a DNS record pointing to the load balanced IP. The SQL Servers would expose the SQL Server endpoint port to the internal load balancer used by the SQL Server Availability Group for connectivity. Synchronous commit mode is utilized on the Availability group to maximise uptime. Since this topic is about Workflow Manager high availability, we would have three instances hosted within a cloud service being exposed via a internal load balancer. This should ideally be on port 12290 (https) for the farm to communicate to the Workflow Manager endpoint. It’s recommended to utilize a domain certification authority (CA), to have a trusted certificate between all the Workflow Manager nodes and Workflow clients. A common question is why would we just not have two servers in the Workflow Manager farm? Basically, Service Bus, utilizes a quorum, so a third node is required for High Availability.
Configuration
Prior to configuring the Workflow Manager farm, ensure you have all the Azure VMs provisioned as part of a cloud service and install the Workflow and Service Bus, with the refresh versions and Service Bus 1.1. All nodes in the farm should have the same bits installed, otherwise your configuration may fail.
Ensure each host has a certificate issued by a domain CA and you have the certificate installed on all three nodes. The certificate must be trusted by the SharePoint Servers, otherwise you’d have a JSON download error message when you try and register and configure the Workflow Manager Proxy
Ensure you have a DNS Host (A) entry created, pointing to the ILB IP address, in the domain which is tied to the common name issued by the domain CA (after you create the Internal Load Balancer)
The workflow manager installer account must be a local administrator on all three farm nodes
The workflow manager installer account must have the Server Admin role in SQL Server, although I have made this work with DBCREATOR and SECURITY ADMIN in the past, the Workflow Manager articles still suggest the SA role
The Workflow Manager RunAs Account must be a domain account and have the log on as a service right (make sure your domain policies do not override this security policy
Create the Internal Load Balancer in Azure
For this step you’ll require:
The Cloud Service Name
The VNet Subnet (for assigning the IP address to the ILB)
Run the following PowerShell to create the ILB:
# Internal Load Balancer Settings – replace these settings with your own environment settings
Create your DNS host entry to point to the load balanced address for Workflow Manager. To determine the IP address of the ILB, if you have not assigned one yourself when you created the ILB, you can run the following PowerShell:
Install and configure the first Workflow Manager node and join the remaining nodes to the Workflow Manager farm. Check the farm is operational by running the following PowerShell:
In the new world of Apps for SharePoint 2013 there is an app-only policy available to allow SharePoint Apps to make requests to SharePoint sites, on premise or SharePoint Online, without user intervention if necessary. So why is this so important in the Cloud App Model (CAM)?
Well, one case is where you may have a middle tier of web services which return SharePoint information that is accessible by a specific set of web clients that do not necessarily need the access to the SharePoint repositories directly or may be external systems making updates or retrieving data from SharePoint that may have no authenticated way of calling the SharePoint without that middle tier. In this case the SharePoint App would have the necessary permissions to retrieve or write data back to the SharePoint repositories without the calling application requiring access. The calling application would only need access to the middle tier web services in order to retrieve the underlying repository data. The middle tier could be secured differently, via certificates or Active Directory.
Another instance could be something like a re-occurring timer job that may need to perform some actions on the SharePoint repository on a regular basis e.g. a timer job or possibly a newsletter flyer being emailed based on information held in a SharePoint repository.
So how do we get this app-only policy and SharePoint App bolted together in order to make use of this new feature in the CAM world? It’s actually very simple and in this blog post I aim to provide you with a sample to work with to get you going.
First we need a scenario….
Scenario
A timer job is required to log how many items there are currently in a SharePoint list which require pending actions. An administrator reviews a list which the SharePoint App writes to on a regular basis to inform them of the number of items that are pending actions.
A simple scenario but something to work from to demonstrate the SharePoint App-only policy. For the purposes of making it really simple, I have created a console app sample that uses the app-only policy.
Important Notes
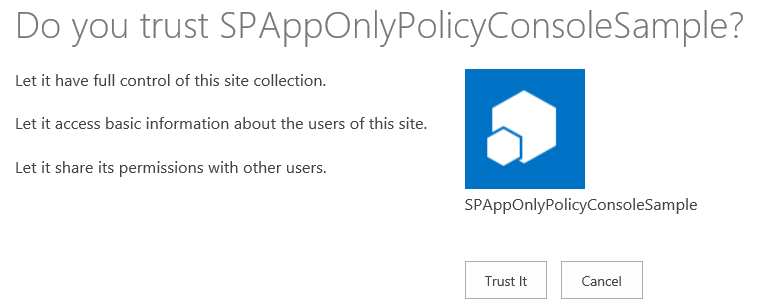
In order to install an App which uses the app-only policy, the user must be a site collection administrator to grant the app-only policy.
Apps that do not make OAuth authenticated calls cannot use the app-only policy. The app-only policy is only available in apps that run out side of SharePoint, provider-hosted or auto-hosted (SharePoint Online) app, basically not apps which are SharePoint-hosted and using the JSOM library.
Steps..
Pre-Requisites
Ensure you include the tokenhelper.cs file in your solution.
Include references to Microsoft.SharePoint.Client and Microsoft.SharePoint.Client.Runtime
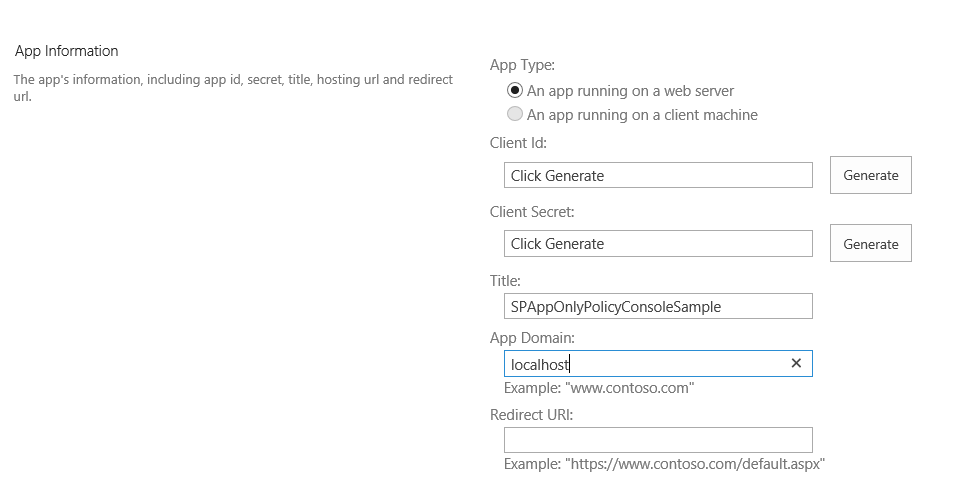
1) Register the console app in the site collection (Office 365 or SharePoint On Premise)
Register the details below and ensure you generate the ClientId and Client Secret, also add the app title and app domain as required. There is no re-direct URL required.
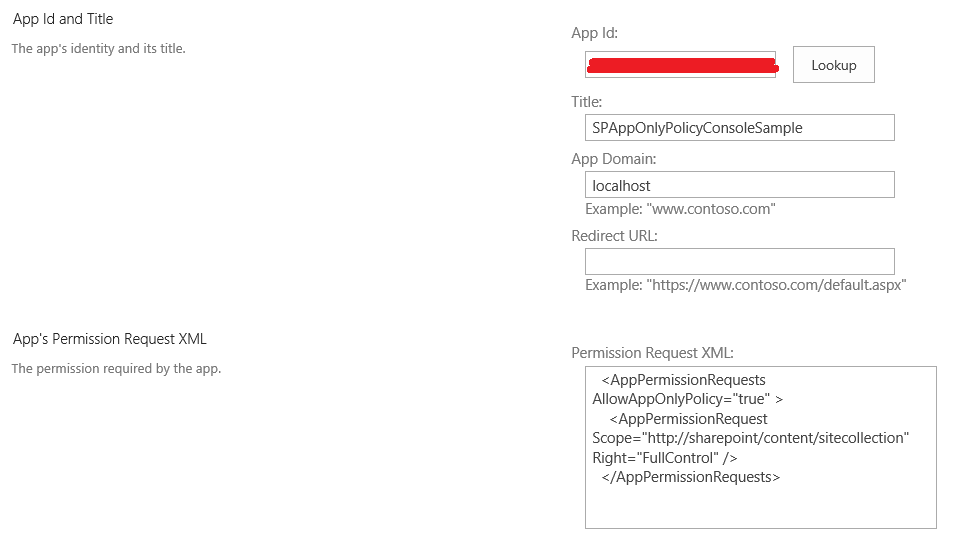
2) Browse to the site collection (Office 365 or SharePoint On Premise)
I allowed the app to have Full Control rights at the web level with the “AllowAppOnlyPolicy” set to “true”.
<AppPermissionRequests AllowAppOnlyPolicy="true" >

<AppPermissionRequest Scope="http://sharepoint/content/sitecollection" Right="FullControl" />

</AppPermissionRequests>The app is now registered.
6) After you click Create you should trust the app that was registered.
5) Update your app.config file with the following section and apply the appropriate ClientId and ClientSecret Note that, getting any of these incorrect may cause a 400 bad request. If you debug the error, the tokenhelper.cs will fail at the following code:
Bad Request Error: If you debug the error, the tokenhelper.cs will fail at the following code when the tokenhelper class tries to receive a valid OAuth response.
6) You can also generate the permission request XML by adding a SharePoint App and updating the permission to allow the app to make app-only calls to SharePoint and generate the appropriate scoped permissions. Then you could view the code in the appmanifest.xml file and copy the relevant generated code. If you are new to this I would recommend following this described step.
7) Add the appropriate code to get a app-only token.
privatestaticvoid Main(string[] args)

{

ServicePointManager.ServerCertificateValidationCallback =

newRemoteCertificateValidationCallback(delegate { returntrue; });

var siteURL = "https://tenantdomain.sharepoint.com/sites/sitecollection";

Uri siteUri = newUri(siteURL);

// Get the realm for the URL

string realm = TokenHelper.GetRealmFromTargetUrl(siteUri);

//Get the access token for the URL

string accessToken = TokenHelper.GetAppOnlyAccessToken(

TokenHelper.SharePointPrincipal,

siteUri.Authority, realm).AccessToken;

// Get client context with access token

using (var clientContext =

TokenHelper.GetClientContextWithAccessToken(

siteUri.ToString(), accessToken))

{

Web web = clientContext.Web;

clientContext.Load(web, w => w.Title);

clientContext.ExecuteQuery();

var title = web.Title;

Console.WriteLine(title);

}

Console.ReadKey();

}
The sample code above displays the web title in the console application.
Getting our pending action items from the documents list
Now lets add the code for the sample to return items from a document library to query pending items.
In the site collection the default document library has 3 items which have a different pending status. The pending column is our flag that an item requires actions. The library items are shown below.
The code required to query the list appropriately can be added in the section where a client context has been generated (clientContent). We use the clientContext with the app-only access token to retrieve the information from the list based on the app permissions specified earlier.
The code has been documented below.
// Get client context with access token
using (var clientContext =
TokenHelper.GetClientContextWithAccessToken(
siteUri.ToString(), accessToken))
{
Web web = clientContext.Web;
// Retrieve the List from the web
List documents = clientContext.Web.Lists.GetByTitle("Documents");
var pendingItemsQuery = @"<View><Query><Where><Eq><FieldRef Name='Pending'/><Value Type='Integer'>1</Value></Eq></Where></Query></View>";
CamlQuery listQuery = newCamlQuery();
listQuery.ViewXml = pendingItemsQuery;
ListItemCollection documentListItems = documents.GetItems(listQuery);
clientContext.Load(documentListItems);
clientContext.ExecuteQuery();
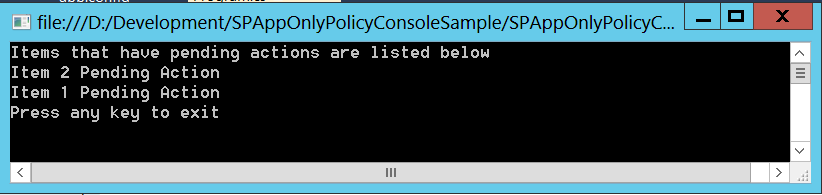
if (documentListItems.Count > 0)
{
Console.WriteLine("Items that have pending actions are listed below");
foreach (ListItem li in documentListItems)
{
Console.WriteLine(li.FieldValues["Title"].ToString());
}
}
else
{
Console.WriteLine("No pending items in documents list.");
}
}
Console.WriteLine("Press any key to exit");
Console.ReadKey();
Returned Console Output
The output of the query is listed below.
The executable can be scheduled using the Windows task scheduler to perform the required functions on a provider hosted server. The app is trusted via OAuth (ClientId and ClientSecret), which registered at the site collection level. To make the deployment easier, you could include a SharePoint app project in the solution and register the app to be deployed to any site collection via the app catalog. Should you need to query more site collections, you could change the scoped permissions to the tenant or deploy the app at each site collection.
A simple solution to have an application query SharePoint sites in Office 365 or SharePoint 2013. The solution can be extended to update a logging list for the administrator to log pending actionable items.The Client side Object Model (CSOM) could be utilized to perform whatever functions are required for any app of this nature.
Moving your SharePoint Infrastructure to the Cloud? Have a requirement to host SharePoint in an IaaS solution? Look no further.
Microsoft have several Virtual Machine Sizes in Windows Azure IaaS which suit the requirements for SharePoint Server 2013 and have also certified Microsoft SharePoint Server 2013 running in Windows Azure IaaS.
The link to the whitepaper below details the best practices for deploying a SharePoint Infrastructure in Windows Azure: SharePoint 2013 on Windows Azure Infrastructure Services
I have highlighted the important aspects of running SharePoint Server 2013 in Windows Azure IaaS below:
Ensure that you have at least two domain controllers running in Azure IaaS to support the IaaS deployed infrastructure. They should belong to their own availability group.
Never shutdown your domain controller in Windows Azure (Shutdown and restart only), you potentially get the infinite DHCP lease removed and at start-up, your domain controller will get a new IP address when it starts from a cold boot.
SharePoint 2013
Ensure that each SharePoint role belongs to the appropriate availability set for high availability. This is so that there is a separation in fault domains and the roles do not go down during maintenance.
Be aware of the network throughput and virtual disk limits per VM size in the depot, this is important to get the correct throughput and number of disks per role.
Never store anything on the temporary space drive (D:).
Ensure that your infrastructure points to the DNS servers defined in your VNet configuration.
Use a Windows Azure load balancer since SharePoint 2013 now supports load balancers that do not support sticky sessions.
Create gold images of your SharePoint servers so that you can deploy them from the Windows Azure Virtual Machine Gallery.
SQL Server 2012
Ensure that you dedicate the SQL infrastructure for SharePoint.
Add the SQL Servers into their own availability group.
Create as many virtual disks as possible to optimize the SQL IO throughout.
Create multiple secondary database files for better SQL IO throughput (8 is the max recommended). Consider reviewing this video series on Channel 9 by Bill Baer for Tuning SQL Server 2012 for SharePoint 2013.
Manage and set the min and max memory appropriately.
This information should provide you the basics of getting started in your journey to deploying a SharePoint farm in Windows Azure.
If you already have a private cloud built on Microsoft Windows Server Hyper-V, I would highly recommend deploying System Center Virtual Machine Manager and App Controller to manage your private and public cloud infrastructure as a minimum. Many of the System Center products should be reviewed, planned and deployed accordingly since the there are no other solutions in the market place, that provide the comprehensive functionality which System Center provides, to deploy and manage Microsoft public and private clouds.
Recently, one of my colleagues wanted to update the SharePoint 2013 welcome control with custom claim values, rather than the default values, when utilizing ADFS SAML claims based authentication. If the signed in users display name is not updated in the all users table on the SharePoint web site, then the welcome control will display the primary encoded format of the user id. For example, if the user was authenticated by a trusted Identity Token Issuer, utilizing the User Principle Name (UPN) as the identifier claim, the format will be as follows:
If you are also not planning on running a SharePoint user profile import, then setting welcome control display can be a little problematic. One approach is to have a custom control in the master page. The control can update the inner HTML of the welcome control, so that it can display a value from augmented claims. In the example below, I specifically pull out the Claim Type of Email, but depending on your scenario, you could use any valid claim augmented from the SharePoint STS which was originally provided by the identity provider STS.
Please note that you may want to check the user is authenticated first and the claims exist, as per the notes in code below.
            // Cast the Thread.CurrentPrincipal
            IClaimsPrincipal icp = HttpContext.Current.User as IClaimsPrincipal;

            string claimValueforWelcomeControl = "No Claims Found";

            // Access IClaimsIdentity which contains claims
            IClaimsIdentity claimsIdentity = (IClaimsIdentity)icp.Identity;
            // Create a Claims Collection - could use IEnumberable and then LINQ
            ClaimCollection claimsCollection = claimsIdentity.Claims;
            // Grab the type we want to display from the claimsCollection
            if (claimsCollection.Count > 0)
            {
                try
                {
                    foreach (Claim c in claimsCollection)
                    {
                        // Whichever claim type you want from claims to be displayed in the welcome control
                        if (c.ClaimType == ClaimTypes.Email)
                        {
                            // consider checking the claimtype exists in the collection first
                            if (c.Value != null)
                            {
                                // Set the Welcome Control Value to the claim value
                                claimValueforWelcomeControl = c.Value;
                            }
                        }
                    }
                }
                catch (SPException ex)

                {

                    Literal1.Text = ex.ToString();
                }
            }

            try
            {
                ClientScriptManager clientScriptManager = Page.ClientScript;
                StringBuilder sb = new System.Text.StringBuilder();
                if (!clientScriptManager.IsClientScriptBlockRegistered("WelcomeControlUpdate"))
                {

                    sb.Append("<script type=\"text/javascript\">");
                    // **** consider JQuery instead: $(document).ready(function (){"); ****
                    sb.Append("window.onload = function () {");
                    // sb.Append("document.getElementById('zz4_Menu').innerHTML = 'Some Claim Value';");
                    sb.Append("document.getElementById('zz4_Menu').innerHTML = '" + "From Claims: " + claimValueforWelcomeControl + "';");
                    sb.Append("}");
                    sb.Append("</script>");
                    clientScriptManager.RegisterStartupScript(this.GetType(), "WelcomeControlUpdate", sb.ToString());
                }
            }
            catch (Exception ex)
            {
                Literal1.Text = ex.ToString();
            }
Microsoft have recently published a whitepaper that captures the results of bandwidth optimization experiments conducted in the Microsoft® Engineering Excellence Center (EEC) lab by using the Riverbed Steelhead appliance WAN optimization devices with Windows Server 2012 Hyper-V Replica.
Windows Server 2012 Hyper-V Replica allows asynchronous replication of Virtual Machines across Wide Area Networks. By utilizing a WAN optimization appliance, like the Riverbed Steelhead, you can improve your overall replication strategy and provide bandwidth effective WAN efficiencies. The de-duplication of the devices abilities is certainly something that provided very interesting results, which I highly recommend reviewing.